Howdy! I was thinking the other day that I needed to clean up my personal portfolio since I have learned so much over the last few years, but it is not reflecting on my site. As I was planning my redesign, I suddenly realized… I have a blog!!
So here I am again and I am planning on booting this thing back up, so that I get back into sharing what I learned and to help myself solidify my understanding of the things I learned. So win-win for all!
Right click on the page and inspect element. If the Inspect Element page does not pop up, try right clicking again in the white space of the page.
Find a tag called Applet, and look for an attribute called archive. That value is the .jar file we need to download.
Note: The attribute called codebase is the directory the jar file is stored.
Go to the url that launched the Java applet and type in the codebase directory plus the jar file name.
If successful, you will have a copy downloaded to your computer.
Next, we need to find a decompiler for Java, and it is important to keep in mind that there are different decompiling softwares. In this example we will use a plug-in for Eclipse (http://jd.benow.ca/). Follow the instructions from this link
Restart Eclipse and create a new project called ExtractedApplet.
Right click the created project and choose Add External Archives under Build Path. Select the .jar file we want to add. This will add the downloaded jar file to your project.
You can now expand the Jar file and double click on the class you want to decompile.
Now you can extract the code and do what you want with it!
W3C defines Web services as, “a software system designed to support interoperable machine-to-machine interaction over a network. It has an interface described in a machine-processable format (specifically WSDL). Other systems interact with the Web service in a manner prescribed by its description using SOAP-messages, typically conveyed using HTTP with an XML serialization in conjunction with other Web-related standards.” In other words, Web service is a software system that bridges communication between multiple systems over a network. Web pages and applications use different types of Web standards to send and retrieve data.
How to setup a Web service?
One of the Web services used is Node JS. It is a JavaScript environment used for developing server-side web applications. The following steps and links will walk through Node and Express setup. The goal is to respond to a query by sending a JSON Object.
Next edit the entry point file. In this case I choose index.js as the entry point file. Add the following information shown. This will return a JSON object.
Note: Depending on how you install Express, you might want to install ‘npm install body-parser’. Used for JSON parsing and parsing POST if need it.
How to connect an Android application to Node.js?
Android recommends an API called Volley that uses a RESTful system to connect to a Web service. Volley is a separate API that allows you to send and receive data from server.
Create a MainActivity and added permission for INTERNET access in the Manifest.xml.
Download Volley() and select Import Module under File. Follow the prompting to add Volley to application.
Android recommends implementing a Singleton pattern for Volley. Here is a link to writing the Singleton class.
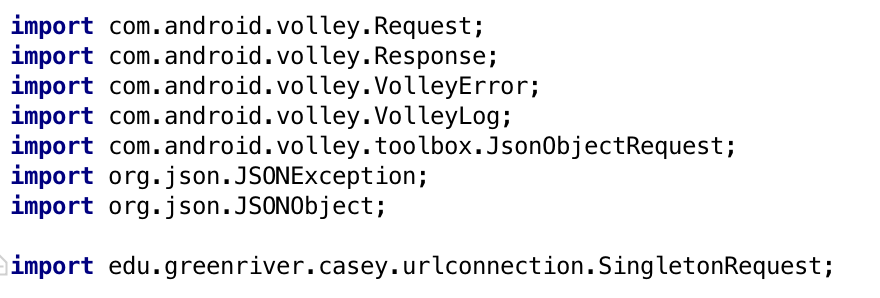
In MainActivity make sure to import the following:
Here is a screenshot for reading in a JSON Object:
Note: If you are running a node server using localhost and testing with a virtual device, make sure that the URL/IP address in the android application uses 10.0.2.2.
So you came up with an awesome idea for an application and now you want to determine what platform to build it in. Do you build an application for Android, iOS devices or both? What are the pros and cons? Here are a few things to think about when researching and some things I have discovered on the interwebs.
Who is your audience
Deciding on your audience will change what platform you build on. Are you looking for coverage based on a specific region of the world or a demographic? As of writing this blog, 66.9 of mobile devices in United States are using Android devices, where iOS device use reported at 28.4%, but the highest revenue comes from iOS purchases. Your target audience is a big key to deciding a mobile platform.
Another detail to think about is platform version. Do you build for the newest software version or plan for an older version. Apple’s developer website shows majority of their users using iOS9(newest), where Android shows their majority using Kitkat and Jellybean(a few generations back).
Create a product name for the application such as MyFirstApp
Note: Language is set to Swift, and the device is set to Universal.
Basic Xcode Navigation
There are three basic panels we will use to create and application:
Navigator Area: Panel on the left-hand side that displays a directory of our project and additional navigation features.
Editor Area: Panel in the center that shows details of files selected from the Navigator Area.
Attribute area: Panel on the right-hand side that corresponds to things selected in the Editor Area.
Additional details can be found here: https://developer.apple.com/library/ios/recipes/xcode_help-general/Chapters/Recipe.html#//apple_ref/doc/uid/TP40010548-CH9-SW1
Layout for First Application
Click Main.storyboard from the Navigator area and the Editor area will show a blank box.
Look at the bottom of the Attribute area. This is your object library, where you can drag and drop different design elements.
Note: When you move an object to your layout a set of blue lines will appear depending on where you move it. This is to help align objects with the layout size.
Drag and drop objects that you want to use for your project. Each object has its own attributes that can be changed. I recommend playing around with the settings.
Here Is An Example of My Layout:
I used 4 labels, 1 button, 1 switch, and 1 slider.
Run Application and Layouts
Launch application/Autolayout
Click the “Run” button, and view your masterpiece!
Wait a minute?! It doesn’t match! I lined it all up on the blue lines!
Welcome to the challenges of Xcode layout! I will be the first one to admit that I am still learning the ins and outs of responsive layout, but I will show some things I have discovered through trial & error, and I’ll provide some links to other, more knowledgable designers.
To get started, I have provided an image of the Layout area which is at the bottom of the Editor panel when looking at a storyboard.
Example:
The right-hand side of Layout area has four icons:
Stack: Aligns selected objects into a stacked view. Can change between vertical and horizontal display.
Align: Positions selected objects on view controller based on positions on the screen. Examples include top, bottom, horizontal, vertical.
Pin: Adds constraints to selected objects based on fixed area. Examples include: aspect ratio, and width/height away from another object.
Resolve Auto Layout Issues: Fixes any constraints missing or incorrect. Examples include Add Missing Constraints, Clear Constraints, and Reset to Suggested Constraints (my personal favorite if you are ever lost.)
The center of the layout area controls what size layout to use based on the size of the device. This defaults to width and height as “any”. This means the layout can be used as a baseline for any device. If you change the layout size to fit an iPhone, then any constraints added will be explicitly for that layout. This allows you to build different constraints based on the different devices you are designing.
The left-hand side expands a hierarchy of your layout. Here, you can tweak existing constraints, and see any sort of errors that might show up based on miss aligned constraints. Any constraints that are highlighted in red mean your layout is not setup correctly. If this happens, I highly recommend going through a few different tutorials on auto layout to find the problem.
Note: If in doubt choose Add Missing Constraints to help “fudge” what isn’t quite working well.
Bringing Our Objects to Life
Our next step is getting our button, switch, and slider to respond based to an action. The easiest way to setup this interaction is to drag and drop our objects as either an Outlet(variable) or Action(method).
First, select the “Assistant Editor” in the top Toolbar. It looks like a vin-diagram on the top right-hand side of Xcode.
Notice that we now see two editors, make sure that one shows our Main.storyboard and the other shows ViewController.swift.
Example:
Move your mouse icon over the button we created and while holding the Control key drag the mouse into the ViewController class. When you let go of the mouse you will see a pop-up over the button.
Leave everything the same, add a name for the button, and click Connect. This creates an interface builder with in our code allowing us to call the name of object to access it.
Example:
The button now has a name, but it still needs to do something. We repeat the same drag and drop process, but change the Connection to Action, create a name for the method, and you can either leave the type as any or change to UIButton.
Example:
Repeat these step for however many additional objects you want to use.
Run your application
Example:
Note: In a bigger application I would create classes that contained what onClick, onSwitch, and onSlide would call, but for such small application I put everything into the ViewController.
Note: If coming back to Android Studio, you can import previous settings.
Installing and updating Android SDK
Out of the box, Android SDK installs the bare minimum needed to write code. If you want to install or update additional APIs, then Android SDK Manager allows you to do so–and you will want more goodies!
Launch Android Studio and you will see a Quick Start pop-up.
Select SDK Manager and a new window will appear
Click Configure and choose any package you want to install or update
Google recommends putting a check mark next to the following:
Android SDK Tools
Android SDK Platfrom-tools
Android SDK Build-tools
SDK Platform
ARM EABI v7a System Image (You can choose whatever image you want per emulator testing. I usually install all.)
Note: Make sure for both Android SDK Build-tools and SDK Platform that you select the newest version.
If you want to code Android Wear, Android TV, or Google Cast, open the Extras directory and select:
Android Support Repository
Android Support Library
Another recommended package to install is Google Play select:
Google APIs
Google Play services
Google Repository
Note: Make sure to put a check on Google APIs in the newest Android API.
Virtual memory is a large array of bytes that an operating system allocates to allow a machine-level program to seem like it has private use of main memory. The range of virtual space starts in memory at a low address and can be set to the highest size that the memory can hold. Usually, the space is a lot less, and each process is given a separate address space to use. This helps minimize the chance that memory can be intentionally or unintentionally written over by another process.
Anatomy of Virtual Memory:
Since memory is allocated from the lowest memory range to the highest range, most memory models are drawn from the bottom up. A basic memory model consists of a Text Segment, Initialized Data Segment (Data), Uninitialized Data Segment (BSS), Heap, and Stack. This modal can be more complex, but the following explanations will only focus on the most basic version.
Example of Memory Stack:
Text Segment:
A text segment, or code segment, contains read-only executable instructions. When the code is executed, the object file is loaded into the text segment of the virtual memory.
Data Segment:
This section of memory contains two types of segments. The first segment is called the Initialized Data Segment. It stores the processes global and static variables that are initialized when code is executed. Data segments can be read-only or read-write. An example of both would be initializing an array[] equal to a string literal that is accessed globally. The string literal, which is a constant, is initialized in the read-only area. The global pointer is stored in the read-write area. The second segment is called the Uninitialized Data Segment or commonly referred to as the “bss”or “block started by symbol”. When a program is executed any variables the kernel has assigned to “null” or variables that were not initialized in the source code are assigned to the BSS segment.
Heap:
A heap starts at the end of the data segment and is used to allocate blocks of memory for a program. The heap is managed by what is called a “heap manager”. In C, you would call a function called malloc() to access the heap. The heap is extremely large compared to the stack, but it can be filled. The heap grows up towards the stack. Libraries and plugins are loaded into the heap.
Stack:
Stack memory is where local variables are stored. In some documentation, local variables are also called automatic variables. They are called automatic variables because the program creating it automatically controls the processes of allocating and de-allocating at the top of the memory region. When a local variable is added to a stack the memory grows down toward the heap. Stacks use a method called Last In First Out (LIFO) which is where the data that was stored last is the first to be removed. An example of LIFO would be pancakes stacked onto each other. They are stacked one on top of the other, from the bottom upwards and in order to reach the bottommost pancake, it is necessary to eat downwards from the top. When a new function is called, the automatic and temporary variables are added to the stack.
Stack and Heap use a pointer register to keep track of the address space available. Since the heap grows towards the stack and the stack grows down towards the heap, the free memory is maxed out once the pointers are the same.
Binary is a format of ‘1s’ and ‘0s’ that when combined represent information that a computer can read. This information is interpreted by the computer’s processors as a high or low voltage. There are different types of binary notation. The three most common binary encoding are unsigned, two’s-complement, and floating-point. I will not go into too much info in this posting on the encodings, but when I have time I will later go into more on two’s-complement and unsigned because they are important things to think about when coding. The importance of these things comes from the fact that carelessness can accidently cause stack overflowing or malicious intent can intentionally “smash” the stack. For now, unsigned means a number greater than or equal to 0, two’s-complement or signed is used to represent negative and positive numbers, and floating-point is a scientific notation for real numbers. These encoding are represented in base-2 where 0 is equal to ‘off’ and 1 is equal to ‘on’.
Example:
Let’s try to convert the number 42 to binary. I think the easiest way to work in binary is to find a power of two that is a little bigger than the number we need. In this example 2^6 = 64 is bigger than 42. So I start by building a block of binary that are set to ‘0’ or ‘off’ to work with:
Bit(on/off):
0
0
0
0
0
0
0
Decimal Value:
64
32
16
8
4
2
1
Power of 2:
2^6
2^5
2^4
2^3
2^2
2^1
2^0
Once we have our block of binary, we start from left to right and put a ‘1’ for the values we need to equal up to 42.
Bit(on/off):
0
1
0
0
0
0
0
Decimal Value:
64
32
16
8
4
2
1
Power of 2:
2^6
2^5
2^4
2^3
2^2
2^1
2^0
Since we turned ‘on’ the value of 32, we can subtract 42 -32 which gives us our next value to look for which is ten. Ten is not a value in our block of binary, but eight is so we turn on the value again by putting a ‘1’.
Bit(on/off):
0
1
0
1
0
0
0
Decimal Value:
64
32
16
8
4
2
1
Power of 2:
2^6
2^5
2^4
2^3
2^2
2^1
2^0
Again we subtract ten from eight which gives us our next value of 1wo. Luckily two is a value in our block.
Bit(on/off):
0
1
0
1
0
1
0
Decimal Value:
64
32
16
8
4
2
1
Power of 2:
2^6
2^5
2^4
2^3
2^2
2^1
2^0
This makes our binary value of 42 as 0101010. If you search online, there are many ways to convert to binary and back. In fact, there are sites and apps that will do it for you. I encourage anyone learning to convert to and from binary to practice by hand before getting comfortable using an application. You will get a better understanding of how it works.
Welcome to my blog. I am a software developer, who trying to get out of their comfort zone explaining and writing things. Hence the birth of this blog. So first off I apologize for any and all grammatical errors you find. If you want, you could make it into a game and see how many I have per post. I am constantly trying and learning new things, so feel free to leave comments and suggestions on things to learn or work on. –Casey–